Search

Saturday, December 1, 2007

Shooting Fireworks - Photography tips for Holidays

Shooting fireworks can be tricky to get right. Here are my favorite settings for getting the best shots

IMG_3946


1) Use a tripod, you need to take long exposures

2) Find a good location. This means you need go there early. if possible get a good foreground like a water body where you can capture some good reflection.

3)Use a cable release to time your shots

3) Use manual focus to focus the fireworks when it starts. You will not be able to use auto focus with much success here

4) Keep ISO low like 100

5) Switch to Manual mode in your camera

6) Choose Bulb mode exposure and keep aperture small like f8 or f11. This will take care of focus as fireworks will keep busting all over the sky.

7) Raw shooting is recommended .

7) Using the cable release start the bulb exposure shot when you see the fireworks starting. release the shutter after you have seen the full burst. This will give a full view of the fireworks rather than just the final burst.

8) Another advantage of using cable release is that you need not look though the view finder all the time. You just need to do it once to make sure that focus and settings are fine. After you have reviewed the initial shots you can make any exposure adjustments. After that you can watch and enjoy the fireworks and just keep clicking the remote cable when you see something interesting to capture.

9) Enjoy the show


Here are some more that I took one the same day. They are linked to my Flickr Ablum http://flickr.com/photos/arunsasi

IMG_3933

Fireworks with zoom blur

IMG_3933

IMG_3939

Happy Independence Day

Sunday, November 25, 2007

The Good Bad and Ugly of online camera dealers

One user at dcresource.com has compiled a list of exceptional, good , ok and bad dealers in camera retail industry. This is a must read list of u are planning to buy a camera.
This is not a complete list as some dealers like amazon.com is not there
The raings are based on feedback from sites like www.resellerrating.com , www.shopping.com, and www.bizrate.com

link :http://www.dcresource.com/forums/showthread.php?t=14677

Thursday, November 22, 2007

10000 views - Thank you all

Yesterday I crossed my first milestone on flickr . My first 10000 views. Current stats says 164 photos / 10,015 views. Thank you all

To see my photos visit My Flickr page

Tuesday, November 20, 2007

beware of these shops when u buy cameras this holiday season

Please be sure to check the rating of any online seller at bbb.org or www.resellerratings.com before you buy. There are many bait and switch shops that do false advertising. Many of them are located at Brooklyn NY


http://donwiss.com/pictures/BrooklynStores/

http://www.boingboing.net/2005/12/14/brooklyn-camerastore.html

Thursday, November 15, 2007

How are camera camcoder lenses made

Here is a video that shows how camera and camcorder lenses are made.
Another useful resource for learning how lenses are made is the Canon Virtual lens Plant. This site shows the end to end process from sand to lens assembly. The lens showed is the super telephoto EF 500


Wednesday, November 14, 2007

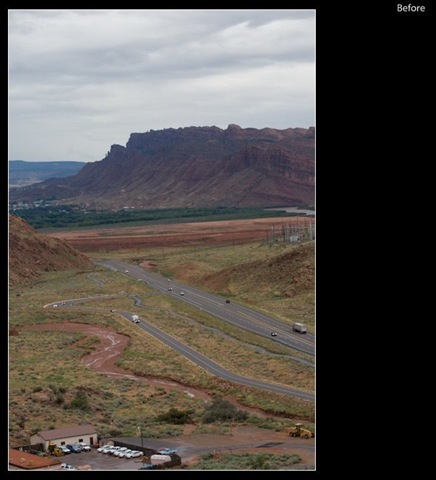
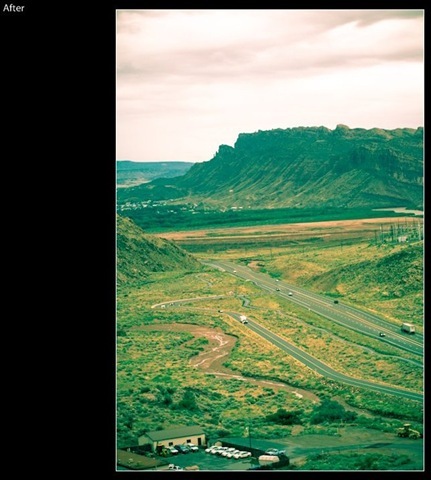
Cross Process Lightroom plugin / Preset

cross_process_experiment_before

Before

cross_process_experiment_after

After

This is a preset for Adobe Lightroom available for download at at Lightrooms Killer tips  website

Its gives a cool effect to some pictures. It tends to apply a green tint so be selective in where u use them. You might find that some otherwise boring photos will get a new life with this preset. Here is one such attempt from me. This was taken at the Arches National Park, MOAB,Utah.

Sunday, November 11, 2007

Lucis Look with Lightroom - Adobe Lightroom tips

Originally found in DP Review Forums link: http://forums.dpreview.com/forums/readflat.asp?forum=1014&thread=25577665

You can see several samples of this effect in the forum post.

Settings suggested by user :FredJamesPhotography
Slide exposure , recovery , Fill Light ,Contrast ,Clarity, Vibrance to 100

Then adjust until u get the colors you desire. I like to keep the colors low

Then blacks and exposure to get a pleasing appearence

Try this out and see if you find it interesting.

Use of Natural Objects in the frame

This is one quick and easy tip that could improve the quality of photos many fold. Instead of the regular straight on approach to taking the picture, look around for some natural object that can be included in the frame as a foreground or to enclose the subject. This would become a natural frame for the photo. In this case I tried to include a tree in the frame to make the subject a bit more interesting. Sometimes you may need to add a bit of fill flash or else the foreground will appear very dark. Adding a string foreground or a framing to the composition will make it stronger.

Thursday, November 8, 2007

Adobe Light Room Tip - Edgy Effect

If you use Adobe Lightroom - A new and useful photographic workflow tool from Adobe, you should try this cool effect. This is by mattk from lightroomkillertips.com
This effect can be useful for Street or Urban type of photography. he does a lot of fast adjustments to various settings like recovery, filllight, contrast etc. Luckily there is a detailed instructional video of about 10 MB. You may have to watch the video twice or thrice to get the idea

here is the link http://www.lightroomkillertips.com/2007/video-surreal-edgy-effect/

Wednesday, November 7, 2007

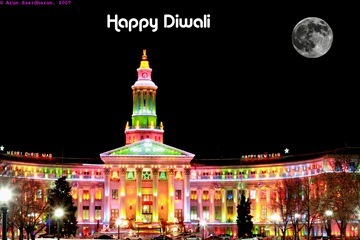
Happy Diwali - Festival of Lights

Happy Diwali

Diwali is the festival of lights in India. I wish all my friends a very happy Diwali.

For more Diwali Photos visit http://flickrexplorer.appspot.com/flickrtest?actionPerformed=search&searchText=Diwali&searchTag=&searchUser=

More on Diwali at http://en.wikipedia.org/wiki/Diwali

Monday, October 29, 2007

Winter Photography Tips and Tricks - Part 2

Here are some more useful tips for proper metering in tricky situations

1) Meter off the blue sky

If you have a clear blur sky over you, a very good approximation of average metering can be obtained by metering off the sky.

2) Metering off your Hand

Your hand can also act as a good exposure metering source. if the same light falling on the object you are planning to photograph is falling on your hand, then you can adjust for a proper exposure of the palm of your hand. Its important to remember that you need to open one stop more of light after you have set proper exposure for your hand. The easiest way achieve this by adjusting the shutter speed. If you see 1/60 sec as a proper exposure on you hand, the opening one stop more will give you 1/30 sec. Keep Aperture constant here. If you use the manual mode, you should find this easy. Another way is to keep increase aperture by one stop. This will impact the depth of field and therefore not suited in certain situations (same can be said with shutter speed also). If you are adjusting the aperture, then if if you need to open op one stop, then go to the next lower f number. If the current aperture is f5.6, then move to f4. The color differences in skin wil not make major changes to your exposure.

Wednesday, October 24, 2007

Metering Snow - Winter Photography Tips and Tricks - Part 1

Metering is a very complicated subject and i am still learning the basics of it. All camera meters try to expose the subject as a medium tone/ Average exposure. In many cases that will work. Many of the objects that we deal with in real life have medium tone.

All light meters are calibrated to 18% grey or Average. What this means is that when you expose for an average subject you have a very good chance of getting the metering right. But consider a more complex situation like Snow or a Black gorilla. These are not average subjects and the light meter will be way off if it tries to meter them. If you take pitures of snow, you may notice that the snow itself appears grey and not white as u see it. This is because your camera light meter is trying to expose the snow as 18% grey and not as white.

In these situations its best to have a 18% gray card with you. Meter the gray card on the same light that falls on the snow. This is very important. Adjust your exposure to get the right settings and shoot. This will give you the correct exposure you need. Snow will start to look white again.

18% grey cards are very inexpensive and are available in most photo shops.In addition to exposure control, these grey cards also help you to maintein proper white balance in your picture. If you have pictures with tint of yellow or blue tint, then this could be a very good solution to these problems. What you need to do is take an additional photo with the grey card on the same light. And the in post processing, set the custom white balance to the grey card's color. This will correct any color deviations in your picture in one click.

Here are some highly rated ones from Amazon.


If you are serious in getting proper color and exposure in your pictures, then you should definitely invest in one of these.

Again you may not be able to carry these cards everywhere you go. Here is a good trick in those situations. This will help with correct exposure but not with white balance. Use the gray card to calibrate the palm of your hand. Once you know the difference in exposure, its easy to meter off your hand and adjust to make it 10% gray reading.

This tip will help very much during Winter when you need to capture fun moments in snow .

Saturday, October 20, 2007

Outdoor Photographer Seminar in Denver - tried out the 1Ds MK III


I am currently attending a two day seminar titled "2007 Outdoor and Digital Photo Seminars"
Canon was the official sponsor and there was a stand with their latest gizmos.
I was able to try out the yet to be released 1Ds MK III their flagship model. the 21 MP monster will hit the stores in couple of months.


It had the new canon 14mm L lens on it and the field of view is anything beyond compare.. That is a serious wide angle lens for a full frame camera. The canon had an amazing AF. The weight of the combo was alomst as much as my Rebel Xti+grip +my largest lens(70-200 4 L). Excellent build quality and top notch performance. This one is going to give the medium format serious competition. It has only 5 fps so i dont think its goging to be used by sports photographers like its 1.3x cropped cousin. Main applications would be studio and landscape photography.


Pre Order from Amazon now!!!!


Tech details from Amazon:

Product Features

  • 21.1-megapixel full-frame CMOS sensor
  • Large 3.0-inch LCD display with Live View and seven brightness settings
  • 5 fps at shutter speeds 1/500 second or faster (for bursts of up to 45 Large/Fine JPEGs or 15 RAW images)
  • sRAW mode; 35-zone metering system; 45-point AF; integrated Self-Cleaning Sensor Unit
  • Powered by LP-E4 lithium-ion battery pack; stores images on CF, SD, or some SDHC memory cards

Technical Details

  • Effective resolution: Approximately 21.1 million pixels (total pixels: approximately 21.9 million)
  • Recording pixels: 5616 x 3744
  • Sensor type: Full-frame CMOS sensor, with primary R-G-B filtration (28 x 18.7 millimeters)
  • Pixel size: 6.4 microns square
  • Lens focal length factor: None (1x)
  • Imaging processor: Dual DIGIC III image processors
  • Maximum frames per second: 5 frames per second (fps) at shutter speeds 1/500 second or faster, in all recording modes
  • Drive modes: Single; silent (single-frame); high-speed continuous (5 fps; adjustable 5 to 2 fps); low-speed continuous (3 fps; adjustable 4 to 1 fps)
  • Maximum number of frames / burst: JPEG: 45 (full-resolution, Level-8 fine compression); RAW: 15; RAW plus JPEG: TBA
  • Flash sync speed: Up to 1/250, with EX-series Speedlites
  • Shutter "lag" time: Approximately 55 milliseconds (from half-way to fully depressing shutter button)
  • Start-up time: 0.15 seconds
  • Image type: JPEG, RAW (14 bit); improved A/D conversion to 14-bit processing for 16,384 individual tones
  • Highlight tone priority: Improve tonal range in highlight areas by approximately 1 stop (C.Fn II-2)
  • Noise reduction: Long exposures 1 second and longer (C.Fn II-1); high-speed ISO images (C.Fn II-2)
  • Storage media: Compatible with two card slots and external storage media; CompactFlash (Type I or II, including MicroDrives); SD card slot (SDHC-compatible for 2GB higher SD cards); USB external hard drives (requires optional WFT-E2A wireless transmitter)
  • Recording options: Multiple media recording options: record to only one memory card; record the same image to both SD and CF card; record RAW image to a CF card and JPEG image to a SD card
  • New additional features: Files can be automatically written to another media if card beomes full; select different image sizes and save to different media (example: different JPEG sizes); record same image using all three media options, including external hard drive; copy files manually from one card to another, or to connected USB hard drive
  • Image format options: JPEG (compression adjustable in 10 steps on menu); RAW ("CR2" RAW file format); RAW + JPEG (selectable on rear LCD panel); sRAW ("CR2" small RAW file format; 1 /4 file size of full-resolution RAW, approximately 5.2 megapixels)
  • Resolution options: Large: 5616 x 3744 (approximately 21.0 million pixels); "Medium 1": 4992 x 3328 (approximately 16.6 million pixels); "Medium 2": 4080 x 2720 (approximately 11.0 million pixels); "Small": 2784 x 1856 (approximately 5.2 million pixels); "RAW": 5616 x 3744 (approximately 21.0 million pixels); "sRAW": 2784 x 1856 (approximately 5.2 million pixels)
  • Data recording format: DCF 2.0 and EXIF 2.21; EXIF 2.21--applies "Adobe 1998 RGB" color space tag to images
  • Sound recording: Maximum 30 seconds per sound clip (more than one clip can be assigned to each image)
  • Folder settings: Create new folder and select on memory card
  • 3-part approach to dust reduction: EOS Integrated Cleaning System; self-cleaning sensor unit--low pass filter in front of the sensor vibrates at a very high frequency for about four seconds to "shake" off loose dust and dirt; occurs on start-up and shut down--can also be activated by user or totally disabled; Dust Delete Data: a test shot is taken and any dust spots are "mapped" and added to each image's text data; automatic removal possible in Canon DPP software; manual: user can lock up mirror to blow off any dust or have service technician wipe sensor clean
  • LCD monitor: 3.0-inch (diagonal) TFT color; approximately 100% coverage; approximately 230,000 pixels
  • Playback options: Single image; single image with info and histogram; 4-index or 9-index image; magnified zoom display
  • Live View type: Electronic viewing of scene, directly off imaging sensor, on LCD monitor
  • Coverage: Approximately 100%
  • Metering: Real-time evaluative metering (off CMOS imaging sensor)
  • Grid display: Two vertical and two horizontal lines; can be turned on or off by user
  • Aspect ratio: Masking for 6:6, 3:4, 4:5, 6:7, 10:12, and 5:7
  • PC live view: Enabled using EOS Utility (v.2.0) (use computer monitor as viewfinder)
  • Shutter speed range: 30 seconds to 1/8000, plus bulb (1/3, 1/2, or full-stop increments when user-set)
  • Maximum flash sync speed: 1/250 second
  • Anticipated shutter durability: 300,000 exposures
  • ISO range: 100 to 1600, in 1/3-stop increments; ISO 50 and 3200 can be added via ISO extension on menu; new ISO safety shift (camera shifts ISO in Tv or Av mode if needed to preserve exposure)
  • Exposure modes: Manual, Aperture-priority, Shutter-priority, Program, Bulb
  • Metering: 63-zone metering linked to 19 AF points; Evaluative metering (63-zone, linked to active AF point); Center-weighted metering; Partial metering (approximately 8.5% of the picture area); Spot metering (approximately 2.4% of the picture area); Options: Center only; linked to any of 19 AF points; and Multi-spot metering up to 8 readings
  • Metering range: EV 0 to 20 (all patterns; at normal temperatures)
  • Exposure compensation: Possible in any Auto exposure mode; up to +/- 3 stops, in 1/3-stop increments
  • Exposure bracketing: 2, 3, 5, or 7 shots (selectable with C.Fn I-6); up to +/- 3 stops, in 1/3-stop increments; Standard Auto bracketing, via aperture and/or shutter speed
  • Compatible flashes: Canon EX-series Speedlites (TTL flash not possible with non-EX speedlites)
  • E-TTL II: 63-zone metering with EX-series speedlites; evaluative E-TTL flash metering (can be averaged over all 63 metering zones); distance information now used from compatible Canon EF lenses for flash calculations
  • Flash metered manual: Possible with flash in Manual mode, via FEL button
  • Flash exposure lock: 2.4% Spot metering of pre-flash illumination
  • Flash exposure compensation: Possible on body for certain speedlites (up to +/- 3 stops, in 1/3-stop increments)
  • Flash exposure bracketing: Possible with 580EX II, 580EX, 550EX, MR-14EX, and MT-24EX (set on Speedlite)
  • Hi-speed flash speed: Possible with EX-series Speedlites, up to 1/8000 second , normal maximum x-sync is 1/300
  • PC socket: Standard; sync line voltages up to 250v are OK through PC socket or hot shoe
  • Number of AF points: 45 (inside of ellipse area of focus screen); 19 high-precision cross-type points (require f2.8 or faster lens for cross-type coverage); 26 assists points (require f5.6 or faster lens)
  • Number of cross-type points: 19 points--any of these can be user-selected with manual AF point selection (high-precision type points; require a f2.8 or faster lens; center point requires f4 or faster)
  • Focus modes: One-Shot AF (for stationary subjects); AI Servo AF (for tracking moving subjects)
  • Manual AF point selection: 19 AF points ( default); inner 9 AF points (via C.Fn III 9-1); outer 9 AF points ( via C.Fn III 9-2)
  • Automatic AF point selection: Possible in both One-shot and AI Servo AF modes
  • AF On button: AF button on rear of body executes AF and metering; AE Lock button can switch functions with AF On button via C.Fn IV-2-1
  • Viewfinder coverage: 100%, vertically and horizontally
  • Eyepoint: 20 millimeters
  • Magnification: 0.75x
  • Focusing screen: Ec-C IV (new standard focusing screen); interchangeable with Ec-series screens from all previous EOS-1 series cameras
  • Diopter: -3 to +1.0 (user-adjustable); further adjustment possible with Eg series diopter lenses
  • Mirror lock-up: Possible via C.Fn III-14; new: option to have mirror remain up for multiple pictures, until SET button is pressed
  • Eyepiece shutter: Built-in; activated by lever to right of eyepiece
  • White Balance modes: Auto (WB is read off of CMOS imaging sensor only); Pre-set (Daylight, Shade, Cloudy Tungsten, Fluorescent, Flash); Custom (reading taken off 18% gray card or white object; up to 5 custom readings can be stored); Color Temperature (range 2500k to 10,000k; 100k increments); Personal WB settings--PC-1 to PC-5 (up to five, created in computer and uploaded into camera)
  • White Balance compensation: Alter white balance in amber-blue direction, and/or magenta-green direction +/- 9 levels
  • White Balance bracketing: Alter White Balance in amber-blue direction or magenta-green direction, up to 15 mireds
  • Picture Style: Allows user to easily adjust the "look" of JPEG images, or RAW files processed with Canon software; six presets: Standard, Portrait, Landscape, Neutral, Monochrome, Faithful; adjustable settings: Sharpening, Contrast, Color Saturation, and Color Tone
  • Digital terminal: USB 2.0 Hi-speed (Type B port)
  • Video output terminal: NTSC/PAL
  • System extension terminal: 15-pin terminal (connects new wireless file transmitter WFT-E2A)
  • Remote control terminal: N3-type terminal
  • Custom functions: 57 Custom Functions (personal functions built into Custom Functions)
  • My Menu: Up to six menu settings can be stored separately for quick access
  • Battery: Lightweight LP-E4 lithium-ion battery pack
  • Battery information: Current power source in use (battery, AC adapter, etc.); remaining capacity (displayed in 1% increments, on camera's LCD monitor); current shutter count on this battery charge; recharge performance (displays when battery should be discarded; 3 levels)
  • Main switch: Three settings: Off, On, and On with Quick Control Dial active
  • Camera body exterior material: Magnesium alloy
  • Chassis material: Magnesium alloy, including mirror box
  • Operating temperature range: 32 degrees to 113 degrees F (0 degrees to 45 degrees C); 85% or lower relative humidity
  • Dimensions (W x H x D): 6.1 x 6.2 x 3.1 inches (156 x 160 x 80 millimeters)
  • Weight (without battery or CF card): 41.3 ounces (1205 grams)

Wednesday, October 17, 2007

Recommended SLR Camera Gear for the Uncompromising Beginner

So you want to put together an excellent camera kit without spending much money one gear. This is what I would recommend for general purpose shooting.

Camera bodies keep advancing at a very fast pace. What you get today will probably get replaced with a more feature rich model in 18 months. Therefore if you have a strict budget, it is not very advisable  to go for an expansive camera body. However lenses are almost made for ever. A good lens today would be just as useful 10-15 years from now. In my opinion, its better to invest in good glass than a pro body when u start with photography. You can always upgrade you body later and still use the same good lenses on it. I suggest some of the best affordable lenses that you can buy. Two of the three mentioned here are from the Canon's Luxury L series


  • Canon EOS 400D / Rebel XTi

This is the best value for money when SLRs are considered. Plenty of features. The Canon EOS Digital Rebel XTi has a newly designed 10.1 MP Canon CMOS sensor plus a host of new features including a 2.5-inch LCD monitor, the exclusive EOS Integrated Cleaning System featuring a Self Cleaning Sensor and Canon's Picture Style technology, all in a lightweight, ergonomic body. The EOS Digital Rebel XTi is compatible with all Canon lenses in the EF lineup, ranging from ultra-wide angle to super telephoto lenses, and including Canon's EF-S series lenses, manufactured specifically for Canon's APS-C sized digital sensor. An EF-S 18-55mm is included in the EOS Digital Rebel XTi Lens Kit. 1.6x Lens Focal Length Conversion Factor Image Sensor Type - High-Sensitivity, high-resolution, single-plate, CMOS sensor 3 - 2 Aspect Ratio Recording Format - JPEG, RAW, and RAW+JPEG simultaneous recording provided USB 2.0 Hi-Speed Interface, mini-B port, NTSC/PAL for video output Viewfinder Type - Eye-level SLR with pentamirror Shutter Speeds - 1/4000 to 30 seconds Self-timer - 10 seconds delay, 2 seconds delay with C.Fn-7-1 (mirror lockup) Continuous Shooting Speed - Approx. 3 fps (at shutter speed of 1/250 sec. or faster)


  • Canon EF 17-40 f4 L lens

Excellent for Wide Angle, General Purpose and Landscape photography. a bit short for portraits in my view.

    • EF mount; ultra-wide zoom lens
    • Super Ultra-low Dispersion glass; inner focusing; aspherical lens; full-time manual focus
    • 17-40mm focal length
    • f/4 constant maximum aperture
    • Ring-type UltraSonic Motor (USM)


  • Canon EF 50mm f 1.8 
  • Lightweight and affordable, this sharp lens with a fast f/1.8 aperture is an excellent first lens for those who prefer a fixed focal length, and makes an excellent addition to any photographer’s system for available-light shooting. A traditional Gauss-type optical design ensures sharp performance even wide open, and it focuses as close as 18 inches/0.45m.

    A medium telephoto lens with a large aperture brings the subject closer, creates excellent background blur, gives a longer flash range, and affords a faster shutter speed to freeze the action. A standard zoom lens, with its natural angle of view and perspective, captures the subject plainly, with no special effects. However, you can use standard lenses in creative ways by varying the subject distance, aperture, and angle.

  • Great general purpose lens for low light shooting. Also good for portraits. Excellent deal when you consider the price is only 80$.
  • Strongly recommended for most general-purpose photography
  • Designed exclusively for use with Canon SLR cameras


  • Canon EF 70-200 4 L USM

This is Great telephoto lens for a great price. I often use it for outdoor portraits and even for landscapes.  This high performance L-series telephoto zoom lens ensures excellent image quality for every photographic situation and milieu. Filter Diameter - 67mm Lens Construction - 16 elements in 13 groups Minimum Aperture - f/32 Focus Drive - Ultrasonic 76mm x 172mm 705g

      • EF mount; telephoto zoom lens
      • Ultra-low Dispersion glass with Fluorite elements; inner focusing ring; full-time manual focus
      • 70-200mm focal length
      • f/4 constant maximum aperture
      • Ring-type UltraSonic Motor (USM)

Friday, October 12, 2007

Canon EOS 40D Preview


This is the latest of Canon's Semi Pro Camera Offering. Offers a evolutionary upgrade to the popular Canon EOS 30D.
Some of the Key Features of this camera are

  • 10.1-megapixel CMOS sensor captures enough detail for photo-quality poster-size prints
  • Large 3.0-inch LCD display with enhanced Live View and broadened color gamut
  • 6.5 frame-per-second continuous shooting capability (for bursts of up to 75 Large/Fine JPEGs or 17 RAW images). Excellent for Sport shooting
  • sRAW mode; 35-zone metering system; integrated Self-Cleaning Sensor Unit


The camera has a 5 Star rating and Multiple great reviews at amazon and will be a hot seller for the holiday season.

Buy now from Amazon.com: Canon EOS 40D 10.1MP Digital SLR Camera


Detailed Specifications
Display:
The most easily visible upgrade on the EOS 40D Digital SLR is the camera's larger 3.0-inch 230,000-pixel LCD screen (compared with the EOS 30D's 2.5-inch monitor). Canon broadened the color gamut, and narrowed the viewing angle from 170 degrees to a still wide 140-degree perspective in all directions. An added advantage of the larger-sized display is the ability to use a larger font size for text, making it easier to read setting and menu options on the screen. The camera's menu is organized in the same tabbed format as the EOS-1D Mark III Digital SLR.

Viewfinder increases optical magnification from 0.90x to 0.95x, expands the viewing angle from 251 degrees to 264 degrees and raises the eye point from 20mm to 22mm.

Durability
Camera is made of Magnesium Alloy
The EOS 40D SLR also retains many of the outstanding features of the EOS 30D model, such as its fast 0.15-second initial start-up, its extremely durable shutter (rated up to 100,000 cycles), its top shutter speed of 1/8000 second, and 1/250 maximum X-sync flash shutter speed setting.

Improved Image Quality
Although it is based on the image sensor used in the EOS Digital Rebel XTi, the EOS 40D Digital SLR's 10.1-megapixel CMOS APS-C size image sensor has been significantly improved thanks to the use of larger microlenses over each pixel to reduce noise and expand sensitivity up to ISO 3200. The EOS 40D retains the model 30D camera's 1.6x focal length conversion factor (compared to full-frame digital image sensors or 35mm film) and is compatible with the full line-up of Canon EF lenses as well as the Company's expanding selection of high-quality, affordable EF-S lenses created specifically for Canon digital SLRs with APS-C size image sensors.

Adding to the improved virtuosity of the images captured by the EOS 40D SLR is the camera's 14-bit Analog-to-Digital (A/D) conversion process. Able to recognize 16,384 colors per channel (four times the number of colors recognized by the EOS 30D SLR's 12-bit conversion capability), the EOS 40D camera is able to produce images with finer and more accurate gradations of tones and colors. The EOS 40D also incorporates the optional Highlight Tone Priority and High-ISO Noise Reduction functions first introduced earlier this year with the EOS-1D Mark III Professional Digital SLR.

DIGIC III
DIGIC III is the latest generation of Canon's proprietary image processing engine. DIGIC III technology ensures that the fine details and natural colors of the images are optimally recorded and, as an added bonus, is also responsible for the EOS 40D SLR's high-speed performance, faster signal processing, and even its efficient energy consumption.

sRAW
In addition to retaining the RAW image capture capabilities of its predecessors, the EOS 40D SLR now offers a more manageable "sRAW" recording format. In sRAW mode, the number of pixels is reduced to one-fourth that of a standard RAW image and the file size is cut in half, while retaining all of the flexibility and creative possibilities associated with full-size, conventional RAW images.

Other Hot features:
  • Improved Autofocus and Exposure Control
  • Live View
  • EOS Integrated Cleaning System

This camera can be purchased from Amazon here


Monday, October 8, 2007

Turret Arch - Arches National Park, Utah - Tips for photos and travel

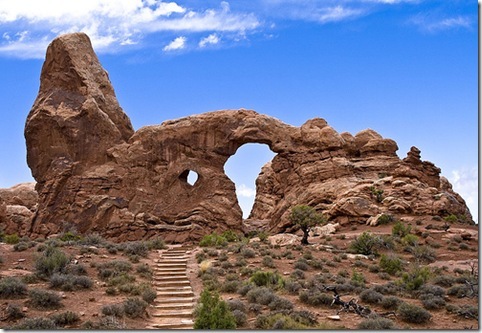
turret Arch

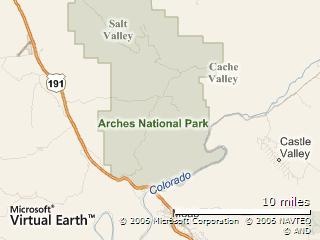
Turret Arch is a very well known geological structure inside the Arches National Park, Utah. Arches National Park contains the world's largest concentration of natural stone arches. Once you are here, you can plan to Hike, Bike, Do rock climbing, horse riding, ATV off-road tours etc. Perhaps even take the Guided tours .Unfortunately I reached there around noon. The flat light will make the pictures dull. If you can reach there for sunset you can really make the pictures pop. Here is a map of the location.

Map of Arches National Park

Tips for getting good photos here

  • The best times to visit and photograph this location is early morning or late evening. The color of the red rocks will be enhanced by the good lighting.
  • Watch for the forecast as it rained the day we went there and we lost much time.
  • Pack your lunch and snacks and get lots of water. Rest rooms and Drinking water are available only in very select locations inside the park.
  • You would need a tripod and a polarizing filter to get good shots
  • If you have a neutral density filter, that would help when the sky is real bright.
  • Try out multiple exposures for HDRs and experiment with Panos
  • Make sure that you don't obstruct other persons view when u shoot

The park has a nominal entrance fee of 10$ per vehicle which is good for 7 days. Make sure that you book your accommodation in advance as The nearby town of MOAB will get filled easily on summer weekends. The downtown has some excellent shops to buy Native Indian art and some good restaurants. Make sure that you grab a copy of the Downtown guide from your hotel. Its is also available in the shops along on the sidewalk. While you are there, please don't forget the Other major parks there like the Canyonlands National Park and Zion

I would Suggest getting one of the following books that would help you understand more about the park and the state

More Information

http://www.nps.gov/arch/

Saturday, October 6, 2007

Preview - Canon EOS 400D / Rebel Xti

canon-eos-400d[1]

Canon EOS Rebel XTi - 400D

What's Hot about this ?

Canon's latest Entry level Digital SLR that packs a lot of punch

  • 10 MP CMOS Sensor

  • 3 point dust reduction technology

    • dust shake off from the low pass filter

    • construction from dust resistant materials

    • software based dust mapping and removal

  • 2.5 inch LCD

  • RGB Histogram as well as Brightness Histogram

  • Continuous shooting at 3 frames per second

  • Large image buffer that holds 27 JPEG or 10 RAW images

  • Nine point Auto Focus

  • Picture Styles (previously available in 5D)

Recommended for

If you are serious about phtography and upgrading from a point and shoot camera.

One of the best entry level SLRs available.

If you want to learn photography and improve your pictures.

(The previous model of this camera Rebel XT is also still popular and really worth looking at as its available much cheaper than the XTi)

I have owned this camera for over an year. Checkout My Flickr Gallery for more sample pictures taken with it

Other cameras that you might want to consider

Nikon D40X, Canon Rebel XT (350D)

Buyer Beware: There are a lot of scam operators trying to sell cameras at a very low price. Keep away from them and buy from reliable dealers only. I recommend going to websites like http://welcome.bbb.org/ and http://resellerratings.com before making the purchase

Or buy it from a reputed store like Amazon


Friday, October 5, 2007

Alpine Tundra Vegetation of Rocky Mountain National Park

Rocky Mountain National Park (RMNP) has a lot vegetation and wild life to offer. However above 11,000 or 11,500 feet ASL, we are above the tree line and all the vegetation will give way to the Tundra. Thats the only kind of plant life that grows in these High Altitudes. The word Tundra itself means "Land of No Trees"

Tundra is subject to extreme weather of freezing temperature, high altitude winds, long periods of snow cover etc. During June to August the Tundra blooms and there is a wide variety of flowers.

Tundra grows at a very slow rate of less than an inch over 20 years. It would take hundreds of years for the Tundra to grow back when damaged. Visitors to the park are required to stay on established trails to avoid damage to the Tundra. However every time I have been to the park, I can see people running around, taking shortcuts, posting for photos etc inside the Tundra vegetation. When you bring children to the park, its your responsibility to educate them on the importance of the delicate environment they are in. What you see in this picture is Tundra vegetation at around 12500 feet ASL. the damage done by walking over them would take several years to heal due to the harsh environment and the slow growth rate of the plant. Damaging the Tundra could cost you a hefty Fine

I am told that there are over 330 variety of Alpine Tundra in the rockies. The best way to have an up close look is to take the Trail Ridge Road inside the RMNP. Please make sure that you educate your group regarding the importance of preserving the Tundra vegetation. Enjoy them from a safe Distance and Dont allow the children to run about on them. Summer time is a good time to visit this place if you want to see the Tundra Bloom. But the season is short and probaly somewhere around June. Please make sure to call the Park authorities and check before planning your trip.

For further reading:
http://www.nps.gov/archive/romo/visit/weather/scenicdrives.html
http://www.us-parks.com/rocky/scenic_drives.html
http://en.wikipedia.org/wiki/Tundra

Tuesday, October 2, 2007

Tips on Low Light Photography - part II

Garden Of Gods, 1805 N 30th Street (at Gateway Rd.)
Colorado Springs, CO 80904
www.gardenofgods.com

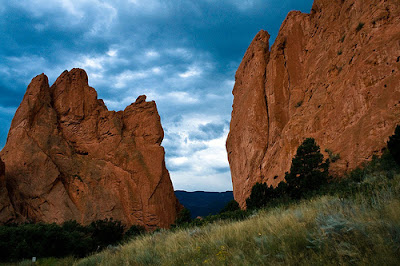
Garden of Gods features some amazing red rock formations in the state. This is a free for all park that offers unpaved hiking paths, interesting challenges for rock climbers, sandstone formations, a wonderful view of Pikes Peak, etc. To make interesting photographs you need to visit this place early before sunrise or during late evenings. This time was my second visit here and i reached there almost around sunset time. The picture above was taken after sunset.

Tech info on the Photo:
Camera: Canon EOS Digital Rebel XTi
Exposure: 0.6 sec (3/5)
Aperture: f/22
Focal Length: 18 mm
ISO Speed: 400
Exposure Bias: 0/3 EV


Here are some more tips to keep in mind while taking photos in low light.

1) I almost always use a tripod. This was already mentioned in the first part of this series but i cant stress this enough. This is the single most important factor in low light shooting.

2) Mirror Lockup. (MLU) . In canon SLR cameras like the rebel series, its available under custom functions. enabling this helps prevent some vibrations caused by the mirror lifting up when shutter is pressed.

3) Remote Cable release This is a very valuable tool. This will help prevent camera shake when u actually press the shutter. Since the switch is connected to the camera using a cable or in some cases Infra Red rays, the shake caused while pressing the shutter button will not transfer over to the camera.

The remote cable release is also very useful for taking Bulb exposures. (Bulb exposures are custom long exposures that is accessible through the manual mode. Basically you can keep the shutter open as long as you want by keeping the shutter button pressed.

More to follow... keep checking
Arun (www.asasidh.com)

Monday, October 1, 2007

Low Light shooting Tips - Old Abandoned wood house near MOAB,Utah


This picture is featured at Deviant Art

On our way to MOAB Utah, we stopped to fuel and get snacks. It was evening time and I noticed this old wood house by the side of the gas station. Shot with a canon 18-55 USM at 55mm. Color and level adjusted in Adobe Lightroom.

Tips for low light shooting
Shooting under low light can be quite challenging. Tripod is a must to capture all the magic and glow in the sky and the surroundings. This time was able to support my hands on rails near the gas station. This gave me enough support to capture this shot without the need for a tripod. Always remember that when u shoot handled using a non image stabilized lens, you need to make sure that the shutter speed is at least one stop more than the focal length you are shooting at. Please consider the field-of-view multiplication factor (1.6x for APSC Canon, 1.5x for Nikon cropped models) when you calculate the effective focal length. I was short of time here and quickly took this shot. It was framed loosely and finally cropped later in post processing to give a more pleasing layout.

Saturday, September 29, 2007

Scenic Drives of the Wild West


This picture is featured at Deviant Art http://www.deviantart.com/print/1831418/

This is one of the many scenic drives that you com across in the vast open roads of America। You may drive for miles and miles on these roads and not see a single human being for hours.


There is so much Dynamic range in this Photo. This is not an HDR. I have done is some minor Level and color saturation adjustments to get this. Propoer HDRs are impossible to do when u are moving at 70 miles an hour because you cannot get multiple exposures from the same point/camera position. It is possible to fake an HDR by using a single RAW image as input.

This was taken from a car moving at over 70 miles per hour. We were coming back from the Arches National Park, Utah.

The Road was very scenic with the Hills on the left , open Roads and beautiful cloud formations. A Hoya Multi coated Circular Polarizer was used.

What you need to remember for taking these kind of shots:

1) When you are moving, as in this case, i am moving in a car, the shutter speed should be atleast inverse of 3 times the focal length u are using. Here i am using a focal length of 54 mm and my shutter speed is 1/200 this saves me from camera shake

2) Keep the horizon straight. It may not me easy when you are moving, you can always correct it later.

3) Rule of thirds is more like a guideline and not actually a rule. If you have the time to compose the shot try to follow it. In this case i was in a car moving at over 70 miles an hour. Composing was not really an option. In these cases you can always frame the shot loose and then correct it later.

Tecnical Details:

Camera: Canon EOS Digital Rebel XTi
Exposure: 0.005 sec (1/200)
Aperture: f/11
Focal Length: 54 mm
ISO Speed: 100
Exposure Bias: 0/3 EV

Tuesday, September 18, 2007

Preview: Canon Powershot G9


Canon Powershot G9

Key Features:

RAW Shooting Capability

12.1 mega pixel resolution

6x optical zoom with Optical Image Stabilizer

Large 3 inch LCD Screen

Face Detection

23 Shooting modes

RAW+JPEG Shooting

DIGIC III Image processor

Takes powerful Speedlite Flashes

Recommended for:
If you are serious about photography and dont want to carry a lot of camera Equipment. Also a good second camera for SLR owners.

Detailed Reviews at:
http://reviews.cnet.com/digital-cameras/canon-powershot-g9/4505-6501_7-32471273.html
http://www.dpreview.com/news/0708/07082005canong9.asp

When looking for a new camera, Beware of fraudulent sellers who advertise very low price
Buy from a reputed store like amazon.

Monday, September 17, 2007

Bear Lake, Rocky Mountain National Park, Colorado

This is an HDR (I will post an article on High Dynamic Range photography soon) rendering of Bear Lake inside Rocky Mountain National Park. I have been to this National Park several times and i still don't get bored. There is always something new to see and learn here. Bear Lake is one of the well known spots inside the park and its a very short trail to here. Unlike some other exotic places inside the park, this one is very accessible. The above picture was taken late in the evening before sunset. I liked the colors cast on the distant mountain and the reflection in the lake. I set up my tripod inside the Lake and was standing in water to take this picture. Technically the picture could have been improved if i was using a polarizer. But then that will keep be going back there again.. in search of the perfect light and shots. Thats what photography and exploring light is all about.

Technical Details
HDR Rendered from Three Different Exposures
Aperture: f18
Shutter Speed: 1.6 sec, 0.4 Sec and 0.8 sec
Focal length: 21mm

Saturday, September 15, 2007

Deers spotted at Royal Gorge


This pic was taken at the Royal Gorge, Colorado which is promoted as Colorado's Natural Wonder. We had finished our day there and were heading back to the Car parking when these deers appeared from no where. They were crossing the road into another part of the wilderness. I took my camera and quickly fired off. Did not get much time to frame and all. But it turned out okay. Applied a little warming tint to the picture to set a mood.

Technical Data:
Camera: Canon EOS Digital Rebel XTi
Exposure: 0.003 sec (1/400)
Aperture: f/13
Focal Length: 48 mm
ISO Speed: 400
Exposure Bias: 0/3 EV

Please let me know if you need any more info

Tuesday, January 30, 2007

Who shoots the Moon ?


This is the first in a series of photo blogs that i am planning to publish here. The above picture was taken on Jan 30th 2007 from outside my balcony of my house in Denver,CO. When I Got a few minutes break before my 4 Hour Long Running Baseline Scenario load test, i decided to give this a shot. Taken with a Canon EOS Rebel Xti (EOS 400 D) . Aperture f4 at a focal length of 200 mm Manual Exposure for 1/400 sec.

It is impossible (at least for me) to get a decent shot of the moon with any of the automatic settings in the camera. Actually, this is a perfect example of where we need to go for the manual mode. The moon is against a black sky here and all the blackness in the sky will confuse the light meter in your camera. If you have a semi pro camera like the Canon
EOS 30 D and a long lens like 400 mm prime or a 100-400 then you could try the spot metering and get a good meter reading with the moon centered in the frame. This was not an option for me as I had a 400 D that does not have a spot meter.

Since I was dealing with high shutter speeds here, I did not need a tripod. Actually it is also a bit impractical for me to use a tripod leaning out of the balcony looking straight up to take this shot.

For this shot, I used the longest lens I had in my kit, the 70-200 4L. A longer lens or a 2x TC would have helped a lot in this case. So what i did here is, I deliberately underexposed the picture to capture the details on the moons surface. for this I went for a high shutter speed for 1/400 sec. After this I did a little bit of post processing in
Picasa to highlight the shadows. Shooting the moon is definitely something i want to keep trying and improve upon. I will be able to spend more time in the open in a couple of months So you can expect more in this series soon.
Until then - Happy Shooting
Arun
www.asasidh.com

Posted by Picasa